INDI Library v2.0.7 is Released (01 Apr 2024)
Bi-monthly release with minor bug fixes and improvements
Stepper focusser directly from Raspberry

Replied by pauledd on topic Stepper focusser directly from Raspberry
pls excuse my bad english!
")
Please Log in or Create an account to join the conversation.
- Gerrit Jan Baarda
-
 Topic Author
- Offline
- New Member
-

- Posts: 8
- Thank you received: 0
Replied by Gerrit Jan Baarda on topic Stepper focusser directly from Raspberry
Please Log in or Create an account to join the conversation.
- Radek Kaczorek
-

- Offline
- Moderator
-

- Posts: 983
- Thank you received: 375
Replied by Radek Kaczorek on topic Stepper focusser directly from Raspberry
All you need is Raspberry Pi + stepper motor + stepper controller + astroberry driver (major update is coming soon).
To keep it simple I decided to power a stepper motor from RPi with 5V. Therefore I used low voltage motor (PG2528-0502U 5V 0.2A 0,5Nm) and controller ( DRV8834 10,8V 2A). I use USB type B port (4 pins for 4 wires of bipolar stepper motor) on focuser side and standard USB port on RPi side. This way I use standard USB type B cable to connect the devices. If you decide to use this solution make sure you don't connect any other usb devices to the focuser port on your RPi. It tramsmits 5V impulses to your stepper motor which could be not good for anything else, including your CCD (!).
I use KStars for remote controling of my mount, ccd and focuser, including precise autofocus with Ekos. This is really cool!
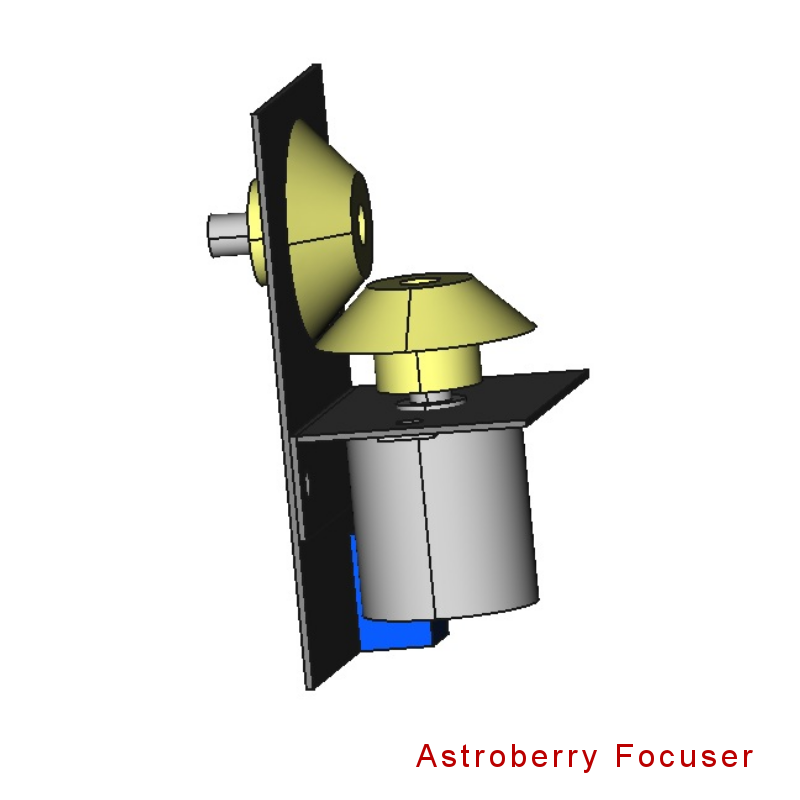
Mechanical design is documented in attached simple FreeCAD files (also available on the project site ). It would be just perfect to have files ready for 3d printing but I will leave it to an expert. In the meantime I used copper laminate as the main building material.

Please Log in or Create an account to join the conversation.
Replied by pauledd on topic Stepper focusser directly from Raspberry
My parts list will be complete soon.I think I will go with the DRV8834 too. I will try a belt drive and try to re-use the original focuser knob since
these are screwed on an strange small shaft that would make require extra money to buy an shaft adapter.
I will buy an aluminium angle with 100x100x1000mm and 1mm thickness and then cut into parts. Its quite cheap and should match between this white plate and the four screws. For the stepper I think I will try this one: Bipolar, 200 Steps, 28×32mm, 3.8V, 0.67A . I borrowed my old pair of EQ5 Motors, IF I will get them back I can maybe use one of these instead. For the motor shaft I will try such a OpenBuilds GT2 (2mm) Aluminium Timing Pulle y

pls excuse my bad english!
Please Log in or Create an account to join the conversation.
- Gerrit Jan Baarda
-
Topic Author
- Offline
- New Member
-
- Posts: 8
- Thank you received: 0
Replied by Gerrit Jan Baarda on topic Stepper focusser directly from Raspberry
Please Log in or Create an account to join the conversation.
- Radek Kaczorek
-
- Offline
- Moderator
-
- Posts: 983
- Thank you received: 375
Replied by Radek Kaczorek on topic Stepper focusser directly from Raspberry
Please Log in or Create an account to join the conversation.
Replied by pauledd on topic Stepper focusser directly from Raspberry
pls excuse my bad english!
Please Log in or Create an account to join the conversation.
Replied by pauledd on topic Stepper focusser directly from Raspberry
I also want to prevent ordering every peace at an different shop which would make it all unecessary expensive. I will now order the aluminium,tools at amazon, cogwheels at Conrad and motor and driver another shop...
I changed my plans to use pure cogwheel solution now. One big with 60 teeth that fits perfect on the 4mm shaft of the focuser and one pinion with ~20 teeth for the motor. Because the two wheels would be very close, may too close I think I will change the mounting also. A Ventilation pipe clamp should be used to mount the motor. Painting will follow..
pls excuse my bad english!
Please Log in or Create an account to join the conversation.
Replied by pauledd on topic Stepper focusser directly from Raspberry
Stepper: SY28STH32-0674A 1.8° 3.8V, 670mA 600 g-cm
Driver: DRV8834
Mount Angle: Aluminium angle 10x10x1000mm (1mm thickness)
Allen screw 8x M2.5 8mm
Pinion M0.5 13 teeth 0.5mm shaft
Gear M0.5 60 teeth 0.4mm shaft
Shaft 4mm 500mm (to replace the original one that came with the telescope (to short/ D-profile))
Here are some images. I only fear that the aluminium profile would not be stiff enough but I think 1mm thickness should be ok. And I dont know how
to fill the space between the allen screws but I will try some shims.


pls excuse my bad english!
Please Log in or Create an account to join the conversation.
- Radek Kaczorek
-
- Offline
- Moderator
-
- Posts: 983
- Thank you received: 375
Replied by Radek Kaczorek on topic Stepper focusser directly from Raspberry
There's a hint - I would highly recommend that you drill bigger holes (or horizontaly elongated holes) in motor-side mount plate. This way you can adjust motor shaft axis when needed for smooth operation of the focuser. Good luck and let us know of the results!
Please Log in or Create an account to join the conversation.
Replied by pauledd on topic Stepper focusser directly from Raspberry
 . I tried to follow the instructions from the astroberry readme but maybe (Kaczorek?) someone can cast an eye on my plan.
Here is the plan for raspi 3.3V powered stepper:
I think I was wrong! The motor uses 0.6A per coil, that is 1.2A and that's way to much for the 3.3V Pin and even for the 5V Pin of the RP2. I consider using external power supply for the stepper (VMOT)

pls excuse my bad english!
Please Log in or Create an account to join the conversation.
- Radek Kaczorek
-
- Offline
- Moderator
-
- Posts: 983
- Thank you received: 375
Replied by Radek Kaczorek on topic Stepper focusser directly from Raspberry
Please Log in or Create an account to join the conversation.