INDI Library v2.0.7 is Released (01 Apr 2024)
Bi-monthly release with minor bug fixes and improvements
Stellarmate on SSD - easier than I expected
- Rishi Garrod
-

- Offline
- Elite Member
-

- Posts: 245
- Thank you received: 56
Replied by Rishi Garrod on topic Stellarmate on SSD - easier than I expected
This is the process I followed.
So first I updated everything:
sudo apt update
sudo apt full-upgrade
sudo rpi-update
Then a reboot:
sudo reboot
Then an update of the bootloader:
sudo rpi-eeprom-update -d -a
Then a reboot:
sudo reboot
Now I am ready to change the boot order. For this I use the raspi-config utility:
sudo raspi-config
Select Boot Options
Select Boot ROM version
Select Latest then press OK
Choose No to Reset boot ROM to defaults
Select OK to end this section
Now we are sure we are using the latest boot ROM.
Next we are going to change the boot order.
Select Boot Order
Choose USB boot first, OK.
Do not reboot!
Now use the SD card copier (make sure your USB SSD drive is attached to a USB 3 port) and copy from the SD card to the USB drive.
This step deletes everything on your USB SSD
Now you can reboot and the RPI should boot from the USB (if the USB drive is not attached it will boot from the SD card).
sudo reboot
This process will have created a boot (/boot) partition and a root (/) partition on the SSD. The root partition will be the size of the whole remaining disk. If you want to make a backup from time to time this is not handy as it will take an age to copy and you will need a lot of storage (another SSD just as big) to make a backup. To solve this we need to shrink the root (/) partition. I used a tool called GParted. To install and run it do the following:
sudo apt-get install -y gparted
Now it gets a bit messy because we want to modify the partition we are currently using and that is not possible. So you must shutdown the RPi, disconnect the USB SSD drive and reboot, this will boot from the SD card (makes a nice check to ensure that still works as a backup). Once rebooted you can connect the USB SSD again.
Now start the partitioning tool:
sudo gparted (or select it from the System Tools menu)
Select the SSD drive in the dialog box on the right had side. It should be something like /dev/sda
In the partition table you should see:
/dev/sda1 and /dev/sda2. /dev/sda1 is the boot partion which we will leave alone. We are interested in /dev/sda2
Select /dev/sda2
Right mouse click and select "Unmount" (otherwise we can't change it).
Right mouse click and select "Resize/Move". I made mine 60GB.
Once this is done there will be free space available. From the Partition menu choose "New". The default is that it will use all the remaining disk. Give it a label (I called my "data") and select OK. Now you have everything ready to change the partition (nothing has actually happed yet). You will see a green check box just under the menu, when you are confident everything is OK press the green check mark. Now the actual changes will be made.
You should now have something that looks a little like this:
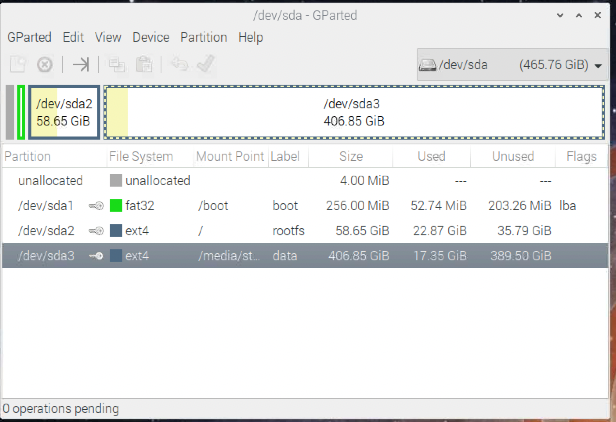
Reboot with the SSD attached and you should be done!
Have to start work now. I will explain how I moved the Pictures folder this evening.
Now I have written down all the steps I realise it's maybe not for the faint hearted (those of you who are not linux geeks) but I hope it will help.
Attachments:
Please Log in or Create an account to join the conversation.
Replied by AstroNerd on topic Stellarmate on SSD - easier than I expected
this is a bug at the moment I have the same issue with the tty USB ports, I can’t connect two of my devices, I have asked Jasem on five different occasions to sort bit nothing as of yet…..

If I get one connected on USB0 then the other just keeps searching and can’t find a port, then it try’s USB0 and forces the other device to then disconnect….it’s been a nightmare, had to resort to using my mount of a Bluetooth device so I can connect…..
Please Log in or Create an account to join the conversation.
- Peter Kennett
-
 Topic Author
- Offline
- Supernova Explorer
-

- Posts: 1000
- Thank you received: 155
Replied by Peter Kennett on topic Stellarmate on SSD - easier than I expected
Please Log in or Create an account to join the conversation.
- Rishi Garrod
-
- Offline
- Elite Member
-
- Posts: 245
- Thank you received: 56
Replied by Rishi Garrod on topic Stellarmate on SSD - easier than I expected
So to move your Pictures folder to the newly created partition there are two methods. I think the Linux guys will go for a Soft Link. Since they know all about that stuff I will focus on the other method which involves modifying the XDG configuration. This is simply telling the OS where various standard folders are like "Pictures".
First copy the Pictures Folder from its current location (in the Home Folder /home/stellarmate) to the new partition (/media/stellarmate/rootfs/home/stellarmate/Pictures). Use the File Manager if you are not comfortable with the command line.
Type the following at a command prompt:
xdg-user-dirs-update --set PICTURES /media/stellarmate/data/Pictures
My path may not match your so ensure you replace "/media/stellarmate/data/Pictures" with the path to your new Pictures folder.
One more step. We need to create a file called .config/user-dirs.conf.
Enter the following in a command prompt.
cd ~
sudo nano .config/user-dirs.conf (yes the "." is meant to be there, it makes a file/folder hidden in Linux)
Type the following in the file:
enabled=False
filename_encoding=UTF-8
Save using Ctrl X, Yes
then reboot:
sudo reboot
Now the OS will know that your Pictures folder is on your new partition.
Please Log in or Create an account to join the conversation.
- Peter Kennett
-
Topic Author
- Offline
- Supernova Explorer
-
- Posts: 1000
- Thank you received: 155
Replied by Peter Kennett on topic Stellarmate on SSD - easier than I expected
But I don't have permissions to write to it, so I cant copy the "Pictures" folder there. The permissions state "Only Owner" can see, modify or add to it.
I just tried sudo chmod 777 /media/stellarmate/data/ and that seemed to work.
Peter
Please Log in or Create an account to join the conversation.
- Peter Kennett
-
Topic Author
- Offline
- Supernova Explorer
-
- Posts: 1000
- Thank you received: 155
Replied by Peter Kennett on topic Stellarmate on SSD - easier than I expected
Please Log in or Create an account to join the conversation.
- Rishi Garrod
-
- Offline
- Elite Member
-
- Posts: 245
- Thank you received: 56
Replied by Rishi Garrod on topic Stellarmate on SSD - easier than I expected
sudo chown -R stellarmate:stellarmate Pictures but your method works fine too.
How do you make the SMB connection? We will need to change the folder it points too.
Please Log in or Create an account to join the conversation.
- Rishi Garrod
-
- Offline
- Elite Member
-
- Posts: 245
- Thank you received: 56
Replied by Rishi Garrod on topic Stellarmate on SSD - easier than I expected
sudo chown -R stellarmate:stellarmate Pictures but your method works fine too.
I will look into the SMB connection and let you know.
Please Log in or Create an account to join the conversation.
- Rishi Garrod
-
- Offline
- Elite Member
-
- Posts: 245
- Thank you received: 56
Replied by Rishi Garrod on topic Stellarmate on SSD - easier than I expected
I am not a real Linux expert myself but this has to be something simple. I will let you know when I have worked it out.
Please Log in or Create an account to join the conversation.
- maxthebuilder
-
- Offline
- Platinum Member
-
- Posts: 912
- Thank you received: 86
Replied by maxthebuilder on topic Stellarmate on SSD - easier than I expected
In your original post you said it was easier than expected and then problems started.
I tried it a couple of times with some random USB sticks and it just worked.
Tomorrow I am actually getting a dedicated 120Gb M.2 SSD module to run Stellarmate.
What you need to do:
If you have a backup of your working Stellarmate SD card (I am on Windows - I use Win32 Disk Imager to backup/restore). Burn it to the SSD.
If you don't have a backup but do have a good working Stellarmate SD card :
Connect SSD to USB while having your SD in its usual place. Boot.
In Raspbian environment - run SD Card Copier and copy your SD to SSD.
Shut down. Remove SD. Boot.
It should boot from SSD and be exactly the same as with the SD but faster.
HTH
ZWO AM5. RST-135. AZ-GTI. HEQ5. iOptron SkyTracker.
TPO RC6. FRA400. Rokinon 135 and other lenses.
ZWO ASI2600MC. D5500 modified with UVIR clip-in filter.
ZWO ASI120MM Mini x 2. ZWO 30F4 guider. Orion 50mm guider.
ZWO EAF x 3.
Please Log in or Create an account to join the conversation.
- Rishi Garrod
-
- Offline
- Elite Member
-
- Posts: 245
- Thank you received: 56
Replied by Rishi Garrod on topic Stellarmate on SSD - easier than I expected
Anyway changing the "Pictures" share (SMB) is very simple.
In the folder /etc/samba you will find a file called smb.conf. We need to edit this.
sudo nano /etc/samba/smb.conf
Scroll down to the end of the file and your will find a section called [Pictures]
modify it to contain your new path: path = /media/stellarmate/data/Pictures
^X Y to save the file
Now we need to restart samba:
sudo smbcontrol smbd reload-config
Now you should be able to view the Pictures folder on your Mac or PC.
Please Log in or Create an account to join the conversation.
- Rishi Garrod
-
- Offline
- Elite Member
-
- Posts: 245
- Thank you received: 56
Replied by Rishi Garrod on topic Stellarmate on SSD - easier than I expected
To get rpi-clone:
$ git clone github.com/billw2/rpi-clone.git
$ cd rpi-clone
$ sudo cp rpi-clone rpi-clone-setup /usr/local/sbin
$ cd rpi-clone
$ sudo cp rpi-clone rpi-clone-setup /usr/local/sbin
I make the backup to a SD card. I am only going to backup the first 2 partitions, boot and root.
I used:
sudo rpi-clone -f2 /dev/mmcblk0
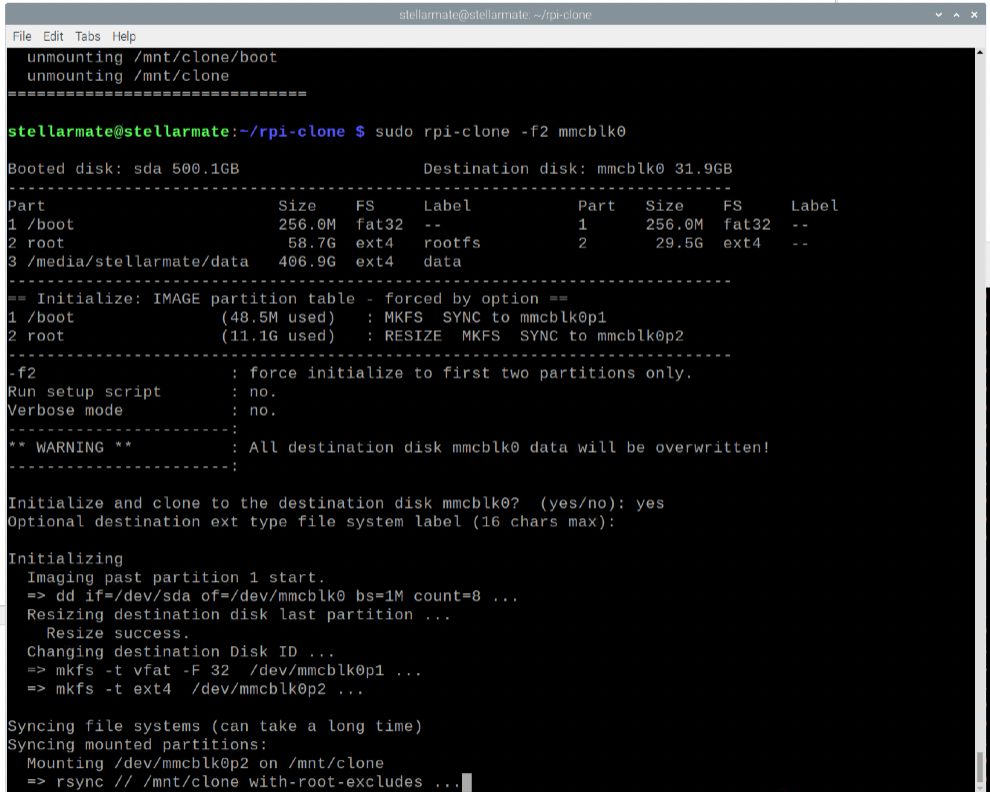
This enabled me to make a bootable clone to a 32GB SD card. More importantly I can clone this back onto a SSD in case of failure. I always copy my imaging data from Pictures at the end of each session so it doesn't require backing up.
Attachments:
Please Log in or Create an account to join the conversation.