
INDI is by design a distributed control protocol where multiple INDI servers may span different hosts and on different network topologies. This enables an N to N communication between front end clients and backend servers. When operating a local or remote observatory, it might be necessary to run INDI servers on multiple devices. If you are using Ekos as your client of choice, then it is necessary that all remote INDI servers are chained, that is, they should all be linked together as to appear at one INDI server to Ekos.
Thankfully, INDI servers support chaining among themselves. In this tutorial, we shall explore a hypothetical scenario where you have two Raspberry PIs over the local network (WiFi or LAN) and each Pi is connected to several devices.
First and foremost, you have to decide which device should act as the primary INDI server host. If you have two identical devices, then it shouldn't matter which is which, any device can be the primary. As a general rule of the thumb, the more powerful device with faster and reliable connection should act as the primary device. In our example, Raspberry Pi #1 is the primary device. For each device, it is recommended to use an alias for the IP address. Raspberry Pi #1 alias is starpi and has an IP address of 192.168.1.50. On the other hand, Raspberry Pi #2 alias is astropi with an IP address of 192.168.1.51
We have the following devices connected to each Pi:
-
starpi (192.168.1.50):
- Joystick
- EQMod Mount
- Canon DSLR
-
astropi (192.168.1.51):
- Robo Focus
- ZWO CCD
In order to refer to the devices by their alias, we need to add them to the /etc/hosts file on the PC/Device running Ekos, and also on the Raspberry PIs. So on each device, you can run the following commands:
sudo echo "192.168.1.50   starpi"  >> /etc/hosts
sudo echo "192.168.1.51   astropi" >> /etc/hosts
Now when you run ping starpi, you should see it is pinging 192.168.1.50
indiserver -m 100 -vv indi_robo_focus indi_asi_ccd
It is important to note that in order to chain this INDI server to the primary server that we shall create later on, we need to know the device names. For most devices, the device name is static and does not change. While other devices get their name at run-time according to the actual model detected. For Robo Focus, the device name is always static RoboFocus, but for ZWO CCD, the actual device name depends on the model of the camera you have. The device name is also the same name you get in the INDI control panel. If you start indiserver with with -vv option above, it will display more verbose information including the device names. You only need to use the -vv argument if you don't know the exact device name.
2016-02-23T13:07:42: startup: indiserver -m 100 -vv indi_robo_focus indi_asi_ccd 2016-02-23T13:07:42: Driver indi_robo_focus: pid=10202 rfd=3 wfd=6 efd=7 2016-02-23T13:07:42: Driver indi_asi_ccd: pid=10203 rfd=4 wfd=9 efd=10 2016-02-23T13:07:42: listening to port 7624 on fd 5 2016-02-23T13:07:42: Driver indi_asi_ccd: sending2016-02-23T13:07:42: Driver indi_robo_focus: sending 2016-02-23T13:07:42: Driver indi_robo_focus: read 2016-02-23T13:07:42: Driver indi_robo_focus: read 2016-02-23T13:07:42: Driver indi_robo_focus: read 2016-02-23T13:07:42: Driver indi_robo_focus: read 2016-02-23T13:07:42: Driver indi_robo_focus: read 2016-02-23T13:07:42: Driver indi_robo_focus: read 2016-02-23T13:07:42: Driver indi_robo_focus: read 2016-02-23T13:07:42: Driver indi_asi_ccd: read 2016-02-23T13:07:42: Driver indi_asi_ccd: snooping on Telescope Simulator.EQUATORIAL_EOD_COORD 2016-02-23T13:07:42: Driver indi_asi_ccd: read 2016-02-23T13:07:42: Driver indi_asi_ccd: snooping on Telescope Simulator.TELESCOPE_INFO 2016-02-23T13:07:42: Driver indi_asi_ccd: read 2016-02-23T13:07:42: Driver indi_asi_ccd: snooping on CCD Simulator.FILTER_SLOT 2016-02-23T13:07:42: Driver indi_asi_ccd: read 2016-02-23T13:07:42: Driver indi_asi_ccd: snooping on CCD Simulator.FILTER_NAME 2016-02-23T13:07:42: Driver indi_asi_ccd: read 2016-02-23T13:07:42: Driver indi_asi_ccd: read 2016-02-23T13:07:42: Driver indi_asi_ccd: read 2016-02-23T13:07:42: Driver indi_asi_ccd: read 2016-02-23T13:07:42: Driver indi_asi_ccd: read
Here we can see that the actual device name is ZWO CCD ASI120MC. Now, we login to starpi and start INDI server:
indiserver -m 100 -v indi_joystick indi_eqmod_telescope indi_gphoto_ccd "RoboFocus"@astropi "ZWO CCD ASI120MC"@astropi
This will start INDI server on starpi and chain it to the INDI server running over at astropi.
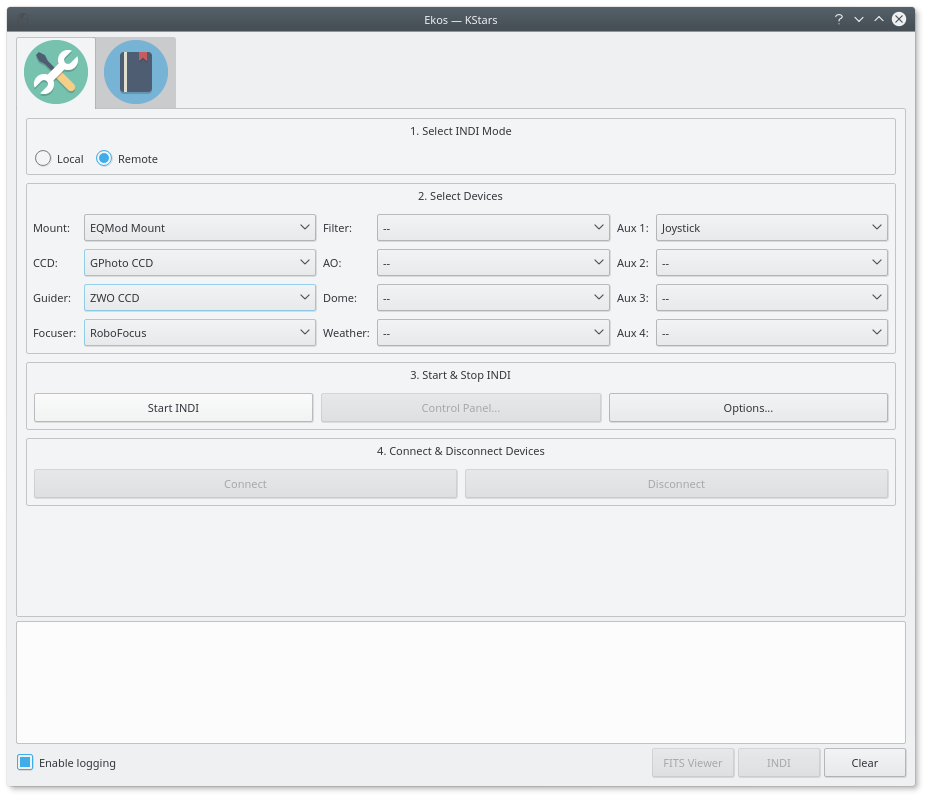
In Ekos Setup, select Remote mode and then select all your devices as illustrated below.
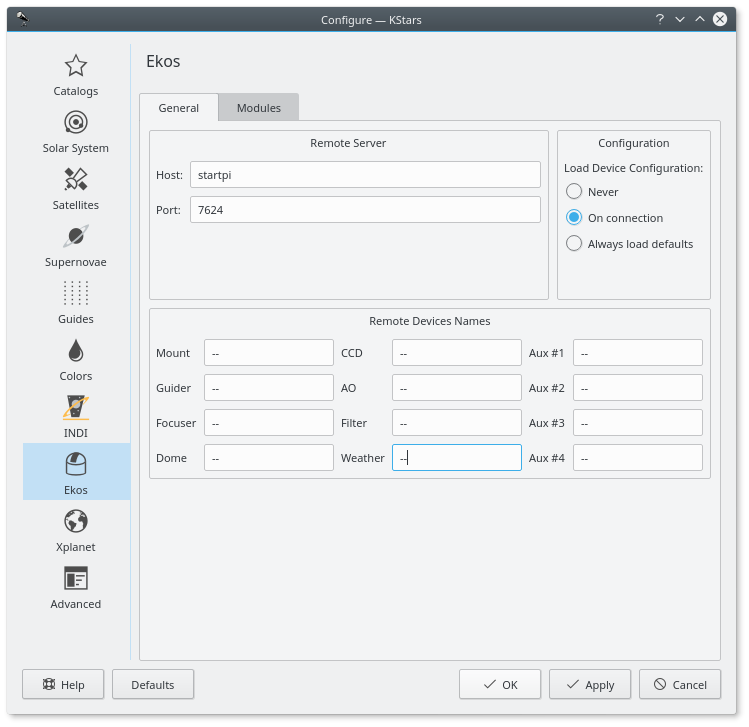
Next, open Ekos options and change the host to starpi and port to 7624. Now you're good to go! Simple click Start INDI and it will connect to to the remove devices. You should see all the devices popping up in INDI control panel.
Next simply click Connect in Ekos Setup and all your device should come online so you can start using Ekos right away!
You can accomplish remote startup and chaining of the INDI devices in a simple Python script. You run the the script on the same machine running Ekos, and it can SSH into the remote devices and start the corresponding INDI servers. For the script to work, you must be able to login to the Raspberry PIs using PKI authentication (SSH Keys) and not password.