INDI Library v2.0.7 is Released (01 Apr 2024)
Bi-monthly release with minor bug fixes and improvements
PHD2 and EKOS interaction
- Jose Corazon
-
- Offline
- Supernova Explorer
-

- Posts: 1119
- Thank you received: 182
Replied by Jose Corazon on topic PHD2 and EKOS interaction
Did you untick the box in the guide module calibration window 'Reset Guide Calibration After Each Mount Slew'? Frequent resetting of the calibration is required for some low-end mounts (like my iOptron SmartEQ). Simply unticking that box should solve your problem.
As for looking through finder scopes: I have not looked through a finder scope in over a year. Just use plate solving in Ekos to find your target. Far more precise and faster than visual. Plus, you can do it all from indoors. Stop the bugs from eating you alive outside in the summer in Texas. Or freezing your fingers off in winter.
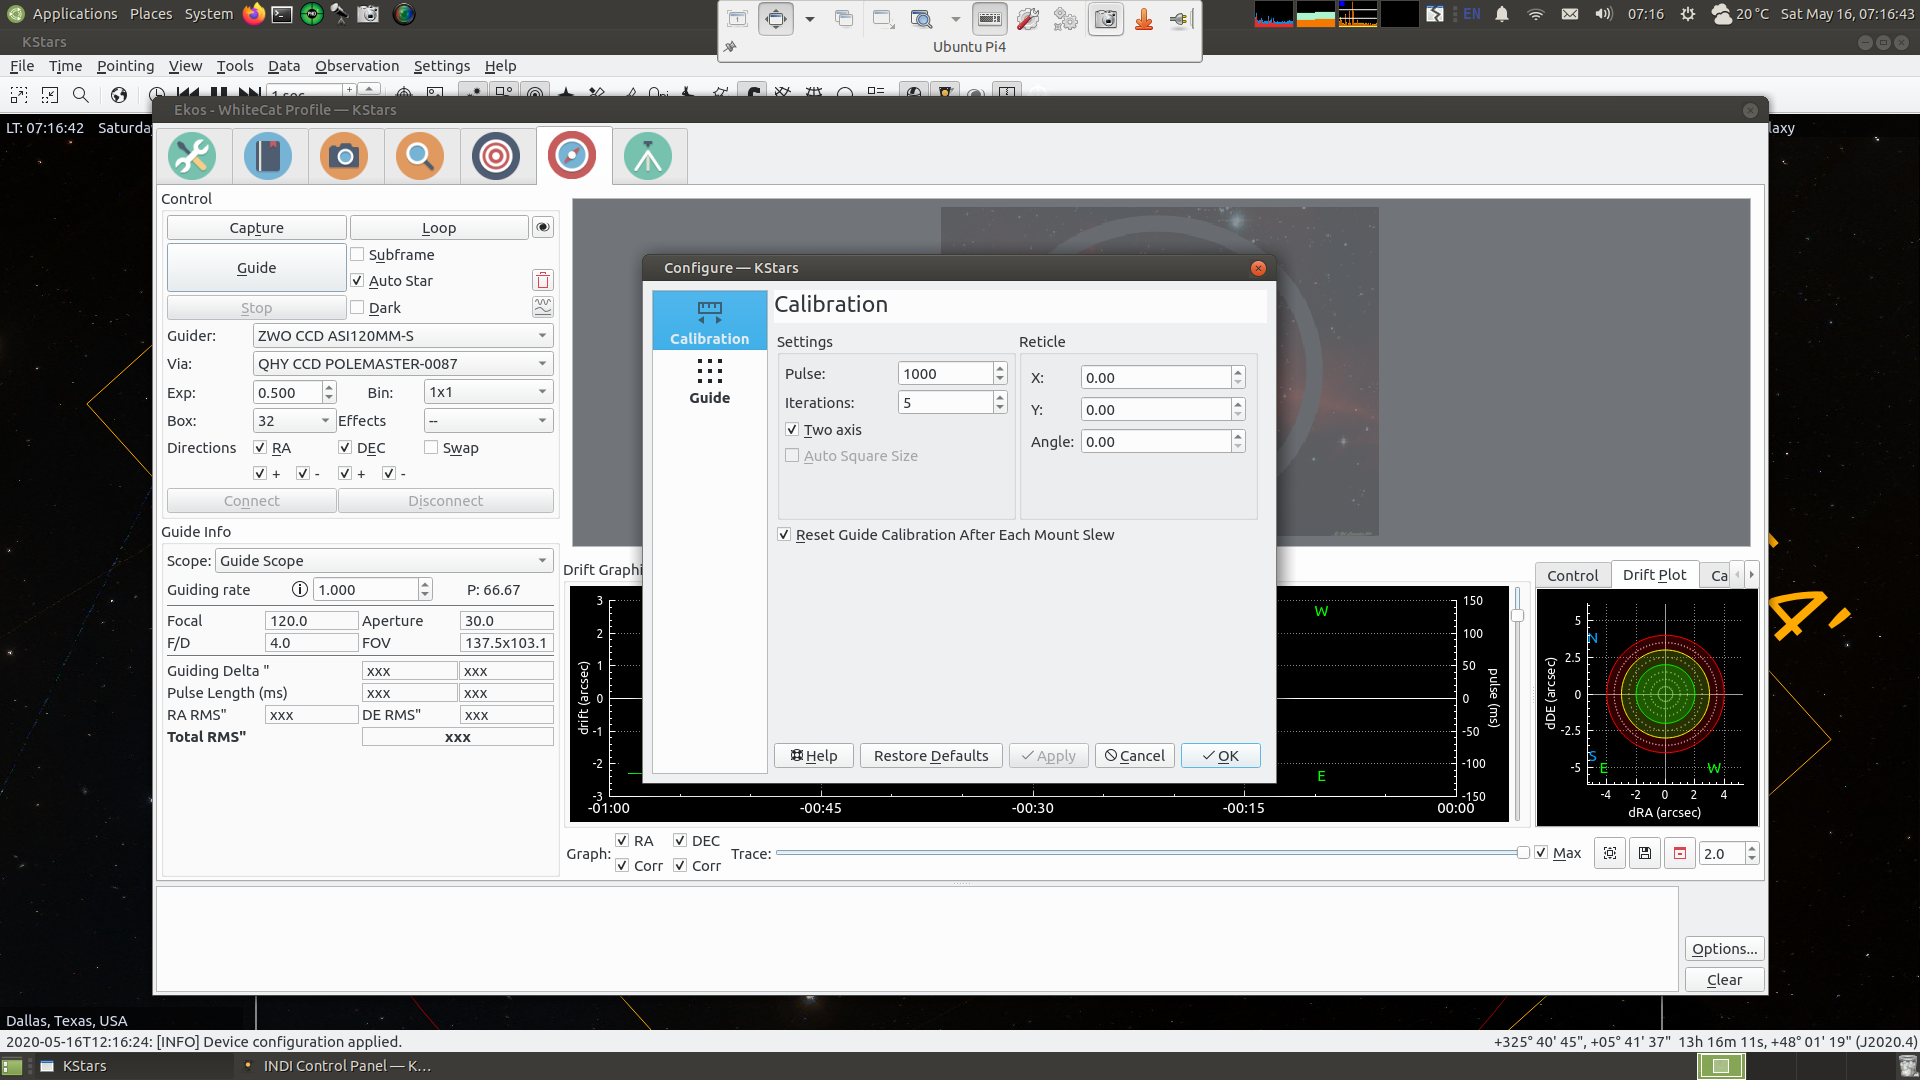
PS: Disregard the selections in the main panel. Of course, I am not guiding through the PoleMaster. That camera just populated that drop-down window when I brought it up for illustration purposes to make that screenshot. Just focus on the small window in front where it shows the box you need to untick.
Please Log in or Create an account to join the conversation.
- Jose Corazon
-
- Offline
- Supernova Explorer
-
- Posts: 1119
- Thank you received: 182
Replied by Jose Corazon on topic PHD2 and EKOS interaction
Hoi Peter!
The PoleMaster is just a QHY camera and you use the QHY CCD driver to mount it. It comes up as QHY CCD PoleMaster in the Control Panel and in the camera selection tab in the PA Module in Ekos. Nothing else required. Very convenient. Plug and Play, really. No need to use the PoleMaster software, just use the camera in Ekos.
The PoleMaster is all about convenience. Yes, it is definitely overpriced for such a simple chip and such a simple lens, but it comes with all those adapters that fit perfectly into the PA scope tunnel on various mounts and hold it there rock solid and out of the way. Basically, with the PoleMaster you pay for the convenience of not having to rig a self-built camera to your mount. But if you like tinkering, as I do, it should be possible to build one from webcam components combined with a cheap lens for very little.
In fact, I am getting inspired by the other threads here that discuss adapting the Raspberry Pi camera for Ekos. There are lenses for that camera you can buy for a few $ that have a suitable FOV, so I could envisage a scenario where I mount the Pi4 running Ekos directly to the mount and use that camera for my polar alignment.
Herzliche Gruesse,
Jo

Please Log in or Create an account to join the conversation.
Replied by Andrew on topic PHD2 and EKOS interaction
That being said, I only use it for my Star Adventurer star tracker. With my main mount, I get close enough with the polescope to use the PAA tool through my guidescope.
Please Log in or Create an account to join the conversation.
- Jose Corazon
-
- Offline
- Supernova Explorer
-
- Posts: 1119
- Thank you received: 182
Replied by Jose Corazon on topic PHD2 and EKOS interaction
Guide scope works, of course, but there is always some degree of flexure that throws it off. You can test that by doing PA first in the East, then West direction or vice versa. That will tell you the degree of flexure in your guide scope. In my case that is almost 5 arcmin (with the mount moving between 60 degrees East to 60 degrees West). That is pretty bad. And I have that Orion 50 mm guide scope bolted down as hard as I could.
Flexure during exposures really only becomes a problem with longer exposures where the mount moves sufficiently to perceptibly alter the forces pulling on the guide scope. Stacking will later eliminate the image shift resulting from the flexure induced shift of the optical axes of guide scope relative to imaging scope. I still get round stars with 120s exposures and more is not practical from my lightpolluted area anyway.
By mounting the small PoleMaster directly on the RA axis, flexure is completely eliminated, though. You can do the same with every self-built camera, but the real issue is to eliminate flexure. If the setup is rickety, PA will suffer.
Please Log in or Create an account to join the conversation.
- Ronald Scotti
-
 Topic Author
- Offline
- Elite Member
-

- Posts: 397
- Thank you received: 17
Replied by Ronald Scotti on topic PHD2 and EKOS interaction
What version of Kstars/Ekos are you running? I am running version 3.4.0 Build 2020 -0106T10:36-16Z and it does not have that option in the Guiding Module setup. I have been reluctant to do an update because I have everything working in this version. I will make a backup SD and try updating it.
I assume in the previous version turning off calibration was NOT an option and it just always calibrated after every slew. How did anyone take any deep sky pictures in this version? By the time the calibration is done the mount has moved off target??
thanks,
Ron
Please Log in or Create an account to join the conversation.
- Jose Corazon
-
- Offline
- Supernova Explorer
-
- Posts: 1119
- Thank you received: 182
Replied by Jose Corazon on topic PHD2 and EKOS interaction
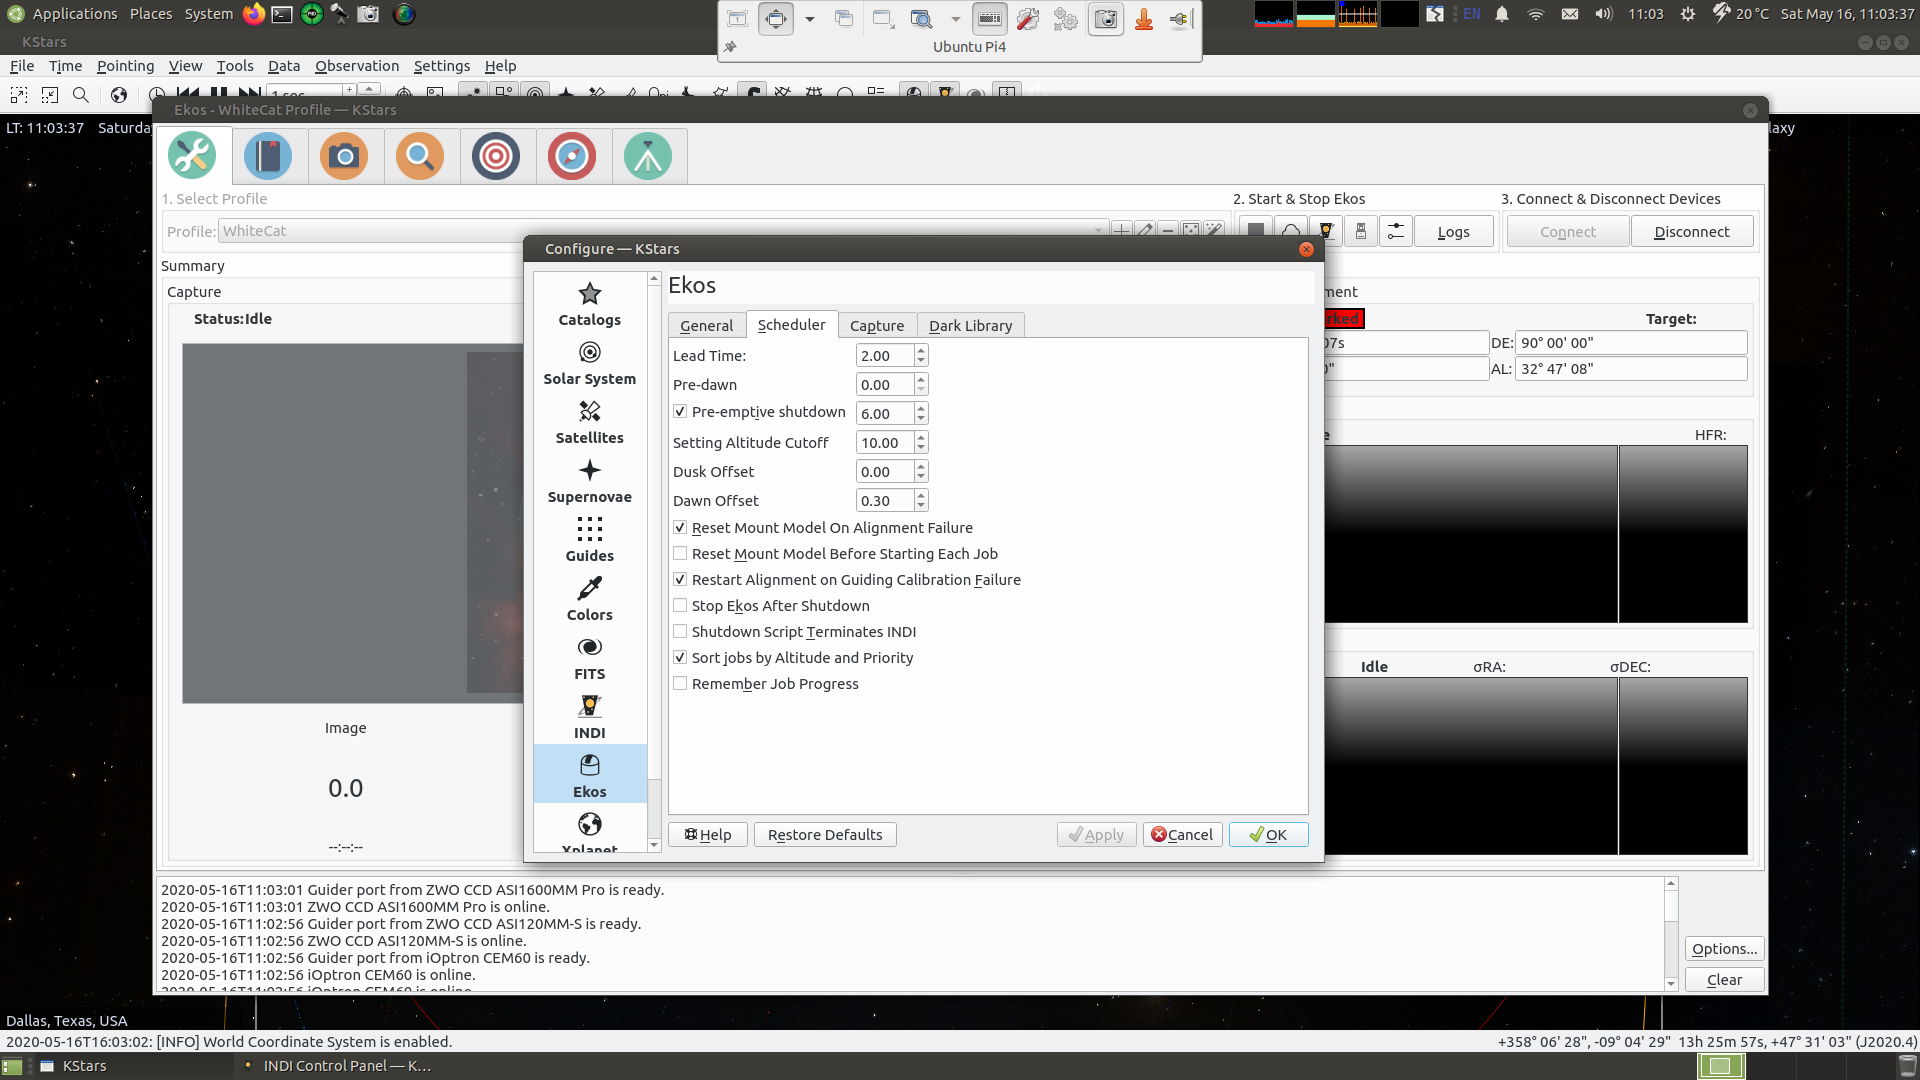
That box was previously in the EKOS > Options > Scheduler tab. Could have been > Capture tab, I am no longer certain. That's where it should be in Kstars 3.4.0.
Check out this thread:
indilib.org/forum/ekos/6486-ekos-kstars-...requently.html#49734
Others had the same problem. That also shows where the box is in Ekos 3.4.0
Please Log in or Create an account to join the conversation.
- Ronald Scotti
-
Topic Author
- Offline
- Elite Member
-
- Posts: 397
- Thank you received: 17
Replied by Ronald Scotti on topic PHD2 and EKOS interaction
I have tried for myself to start a spreadsheet of these type of items and I have over 40 items and 280 lines of text!
I realize this is a work in progress and that's ok and this forum helps fill in those explanations; you just need to be able to find them.
thanks and keep up the good work.
Ron
Please Log in or Create an account to join the conversation.
- Ronald Scotti
-
Topic Author
- Offline
- Elite Member
-
- Posts: 397
- Thank you received: 17
Replied by Ronald Scotti on topic PHD2 and EKOS interaction
thanks,
Ron
Please Log in or Create an account to join the conversation.
- Jose Corazon
-
- Offline
- Supernova Explorer
-
- Posts: 1119
- Thank you received: 182
Replied by Jose Corazon on topic PHD2 and EKOS interaction
Just back up an image of your current SD card (always a good idea) and upgrade to 3.4.3 from the Nightly repository.
Please Log in or Create an account to join the conversation.
- Ronald Scotti
-
Topic Author
- Offline
- Elite Member
-
- Posts: 397
- Thank you received: 17
Replied by Ronald Scotti on topic PHD2 and EKOS interaction
thanks,
Ron
Please Log in or Create an account to join the conversation.
- Ronald Scotti
-
Topic Author
- Offline
- Elite Member
-
- Posts: 397
- Thank you received: 17
Replied by Ronald Scotti on topic PHD2 and EKOS interaction
thanks,
Ron
Please Log in or Create an account to join the conversation.
- Rick Wayne
-
- Offline
- Elite Member
-
- Posts: 222
- Thank you received: 20
Replied by Rick Wayne on topic PHD2 and EKOS interaction
Please Log in or Create an account to join the conversation.